Painting Mystery: Parenting Strategies on the Go


I’m going to leave a cliff hanger for the first time in my writing history, and, yes, it’s a shameless ploy to guide readers especially young parents to my book Parenting Strategies on the Go

Parenting Strategies on the Go

“Parenting Strategies on the Go” -Haven Caylor, Ed. D.


Ammon and Carter were born through surrogacy. Carter was born in San Diego (maybe 15 miles from the In Vitro Fertilization clinic), and Ammon was born in Mission Viejo. From beginning to end, God blessed every move/choice we planned from an egg-donor mother, to choosing two spectacular surrogates ( and their wonderful families), to donating our sperm, to the fertilization, to the implantations, through the gestations, until the births, we were blessed. Carter and Ammon were fertilized in February of 2008. When their surrogates were 6 months pregnant we combined a visit with them in San Diego with a personal cruise on Carnival Cruise lines out of Long Beach. When we ported in Puerto Vallarta and disembarked the ship, there was an artist who painted tiles with his pinky fingernail. In Spanish (you have to remember that I am fluent in Spanish), I gave explicit instructions to his apprentice how I wanted our “futuristic” painting to appear. We told him we would be very late returning, and he said there would be no problem. Even if the artist, Jorge López, wasn’t there, he would be, and he guaranteed that the tile would be finished.

IMG_0676

The Caylor-Browns Gazing into the Pacific Ocean at Puerto Vallarta, Mexico – Jorge López


After a spectacular and long day in Puerto Vallarta, we did, indeed, retrieve our tile. It was BEAUTIFUL, but as we inspected it, we saw an error corrected. What was it? Well, in Chapter 4: Using Souvenirs as Teaching tools after you’ve been on the Go, you can find out. The painting blunder/cover-up still makes me smile and laugh after 12 precious years.

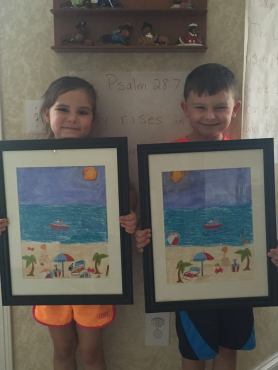
Summer Beach (Mixed Media Artistic Delight)

Ammon & Carter share another Mixed-Media Masterpiece July 20, 2015

Ammon & Carter share another Mixed-Media Masterpiece July 20, 2015

Need (Suggested beginning doses: more paint for darker color OR add more water to lighten it up)

1 Plastic Cup

4 tsp. Water

2 drops Watercolor Blue 

1 Burnt Sienna Oil Pastel Crayon (Rembrandt)

1 Turquoise Blue Oil Pastel Crayon

1 Light Orange Oil Pastel Crayon (Rembrandt)

1 Sheet Water Color Paper

1 Paintbrush

Beach Scene Stickers (eksuccess brand)

Clear glue ( I prefer Elmer’s)

Step 1: With a pencil, etch the line of the beach and etch a line of where the ocean meets the sky.

Step 2: Make a perfect circle for the sun with the round lid of any container.

Step 3: Color the beach, ocean (sea), and the sun with your oil pastel crayons.

Step 4: Mix your water and drops of watercolor blue and apply it liberally over the sky. Once again, the oil based pastel repels the watercolor, so if some gets on the ocean, it’s okay. It can also add to the different hues in the colors of the ocean. 😉 Allow to dry for 24 hours.

Step 5: Stickers do not go well on the slick oil based crayons, SO add clear glue to the backs of the stickers and place them where you want them. Beach scene is ready for display!

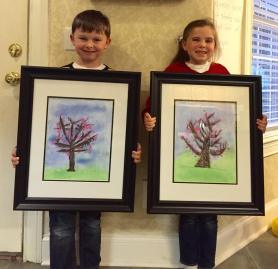
Ornamental Cherry Tree Pastel: A Spring Masterpiece in 4 Easy Steps

Carter & Ammon's Spring Pastel Painting

Carter & Ammon’s Spring Pastel Painting

Need (Suggested beginning doses: more paint for darker color OR add more water to lighten it up)

1 Plastic Cup

4 tsp. Water

2 drops Watercolor Blue 

2 drops Watercolor Green

1 Brown Oil Pastel Crayon (Holbein Oil Pastel)

1 Big dollop of Pink tempera paint 

1 Sheet Water Color Paper

1 Paintbrush

Step 1: On the Water Color Paper, lightly pencil the ground and tree

Step 2: With a brown oil pastel crayon, heavily color the tree

Step 3: Trying not to allow the green and blues to mix, saturate the ground with green and the sky with green. Once again, the oil pastel repels the watercolors. 

Allow the Painting to Dry for 24 hours

Step 4: With pink, tempera paint dollop out pink. With the child’s finger tips (prints) dabb the tree with pink fingerprints to make the pink, ornamental cherry blossoms then allow to finish drying.

Winter’s Full Moon (5 Steps to a Winter, Artistic Masterpiece)

moon3_blog

After an autumn watercolor project turned out so nicely for Ammon and Carter, I decided to try one for winter.

Need (Suggested beginning doses: more paint for darker color OR add more water to lighten it up)

1 Plastic Cup

4 tsp. Water

2 drops Watercolor Paint (Van Gogh #506-Ultramarine)

1 White Oil Pastel Crayon (Holbein Oil Pastel)

Water Color Paper

1 Paintbrush

Step 1: On the Watercolor Paper, Etch out the Winter Scene lightly with a pencil. Carter, Ammon, and I elected to take a perfectly round object to trace our moon. You and yours can draw a moon anyway you wish.

Step 2: Thoroughly color in all objects you want to appear white with the Oil Pastel.

moon_blog

Step 3: Add drops of paint to the water and mix. It doesn’t look like much, but it is PLENTY. Once again if the paint wasn’t dark enough add paint droplets and if it was too dark, add a few drops of water at a time to the glass. Keep a practice Watercolor sheet handy to experiment.

Step 4: Paint! Make sure you saturate the paper. The oil pastel will repel the water (oil doesn’t mix with water).

moon2_blog

Step 5: Find a flat place for your painting to dry.

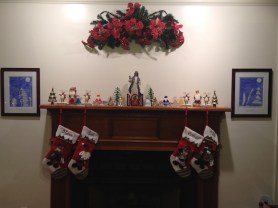
As you can see from the intro photo, we had them framed. We painted the paintings on the 1st Day of Winter, allowed them to dry, then framed them on December 23 just in time to flank the mantel for Christmas. There they will remain until spring.

Mantel_copy